Come see us.
Precocity LLC3400 N. Central Expressway, Suite 100
Richardson, TX 75080
info@precocityllc.com
(972)-378-1030

Google Cloud Composer is a managed version of Apache Airflow that runs on a GKE (Google Kubernetes Engine) cluster.
The latest release supports Airflow 1.10.1, but by default, it lacks the capability to connect to an Oracle database. This is due to an Oracle licensing issue, which requires that you accept their terms for the licensing agreement. Fortunately, adding the Oracle thin client is relatively straightforward. This post will describe those steps.
Let’s get started.
1. Download the file named instantclient-basic-linux.x64-19.3.0.0.0dbru.zip from Oracle’s website. Note that this filename version increases frequently. It’s the first file listed under the Basic Package. You may need to create an Oracle account to download the file. As long as Google Cloud Composer is using Linux x64 containers for its GKE Composer cluster, this option should be safe.
2. Unzip the file on your local drive. In a typical environment, the client files would be copied to the Google Compute Instance, but since this is a GKE cluster, the file system for each node is read-only.
When you create Cloud Composer, a GCS bucket named after the Composer instance is also created. The bucket will contain the folders: dags, data, logs, and plugins, plus a couple of files named airflow.cfg and env.json. Updates to those files are done from the Composer interface. The data folder is the thing we’re going to focus on.
Think of this /data as a read-write extension to the Airflow file system. It has a couple of uses, the first being the perfect location to install the Oracle client. Secondly, because it is accessible by your DAGs, you can create folders for storing things like SQL scripts that you don’t want polluting/cluttering your dags or plugins folders.
3. Using the UI or gsutil command, navigate to the GCS bucket for composer and select the data folder. Create a new folder named oracle_client. The new path will now be /data/oracle_client.
If you’re using gsutil, type the following:
$ gsutil auth login
Your browser will prompt you to authenticate. After doing so, make certain you’re set for the correct project id.
Now, from the folder where you unzipped the thin client, copy the files to the Composer bucket:
$ gsutil -m cp -r * gs://us-central1-composer-xxxxxxxx-bucket/data/oracle_client
Substitute the sample bucket name for your own. If you aren’t in the proper folder, prefix the * with the path to the folder name where the thin client can be found.
Note that the -m flag uses multiple threads to upload the files more quickly and the -r flag recurses the local file system to include the sub-folders.
Depending on your bandwidth, the file copy may take a few minutes.
From the UI, you can drag/drop the files, but make certain the network sub-folder and its files are also copied under /data/oracle_client.
Once the files are copied to GCS you will need to do some additional Composer configuration.
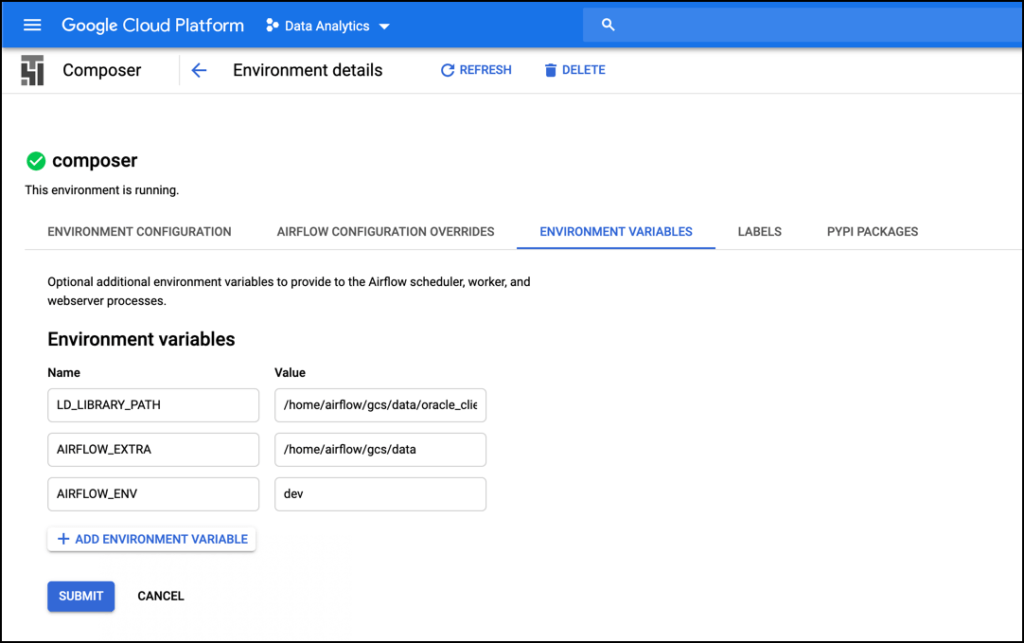
4. From the Composer page, select the instance name and choose the tab titled ENVIRONMENT VARIABLES.

5. Click Edit and add the following environment variables:
LD_LIBRARY_PATH=/home/airflow/gcs/data/oracle_client
AIRFLOW_EXTRA=/home/airflow/gcs/data
AIRFLOW_ENV=dev
The = (equal sign) isn’t entered in the UI, it’s just there to indicate Name/Value pairing.
The LD_LIBRARY_PATH is the only environment variable that is required. I’ve added the additional two environment variables for convenience. I prefer to use environment variables to avoid hard-coding values between projects or environments.
To access an environment variable in your Python code, run the following statement:
import os

env = os.environ.get('AIRFLOW_ENV')
With this value, you can control how your DAG and custom code will work at runtime.
bucket_name = 'gcs-{env}-datalake'

bucket_name = 'gcs-dev-datalake' if airflow_env == 'dev' else 'gcs-datalake'
The first line assumes you’d perform a string substitution to resolve the bucket name before writing to it and the second has some conditional code around the value.
From a database querying perspective, you can use the AIRFLOW_EXTRA environment variable as a prefix to a folder name that can contain artifacts like sql_scripts. In your DAG, reference the filename using:
airflow_extra + / + sql_script + query.sql
Enough about the environment variables. Click Submit to save the environment variables. The update process will take a number of minutes, so be patient.
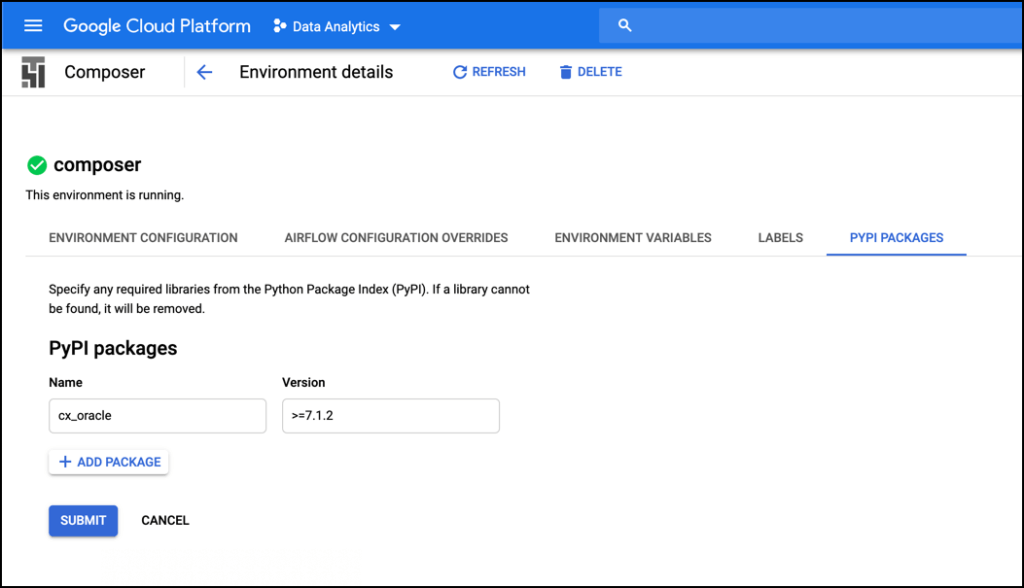
Once that is done, click the PYPI PACKAGES tab. There is one Python package to install.
6. Click Edit and enter cx_oracle in the Name column and >=7.1.3 in the version column.

Click Submit to install the package. Once again, there will be a significant delay while the environment is updated. Just be patient.
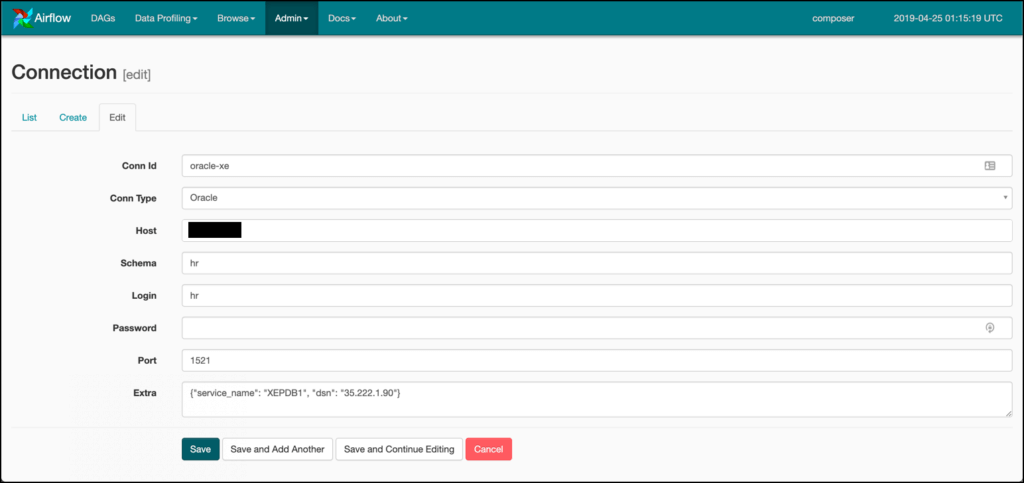
Log into the Airflow web server and select the Admin | Connections menu item.

This sample uses an OracleXE database with the HR schema unlocked. Your settings may vary. Once you’ve saved your changes, you can either use the OracleOperator in your DAG or call the OracleHook in your custom plug-in code. I wrap templated code in my custom plug-ins, so calling the OracleHook is my preference. Here is a basic example of how I use it. Not shown is the import that you need at the top of your module:
import cx_Oracle
The import uses a different case than the package that was imported. This is fine.

These steps will allow you to update Cloud Composer to connect to an Oracle database, plus a couple of tricks around environment variables that may help you with your own implementations. Do you need additional assistance with your data automation projects? Contact Precocity and let us help you meet your business needs.
[hubspot type=cta portal=4762798 id=ba0531a0-1cce-45d9-b67f-58e8d65c6bf7]

Service Design is a historically underutilized practice, invaluable in the uncovering of inefficiencies, roadblocks, bottlenecks, and other problem areas inside every kind of organization. Coupled with current, new, and emerging AI technologies, SD + AI becomes a one-two knockout punch, helping organizations lead data-informed decision-making to achieve the results they need.


Remember when we thought the future would bring us flying cars and hoverboards? Well, surprise. Instead, we got cars with...
